Once you had open your mail software,please choose either you need to create an IMAP or POP3 account.The different of both as per below link:
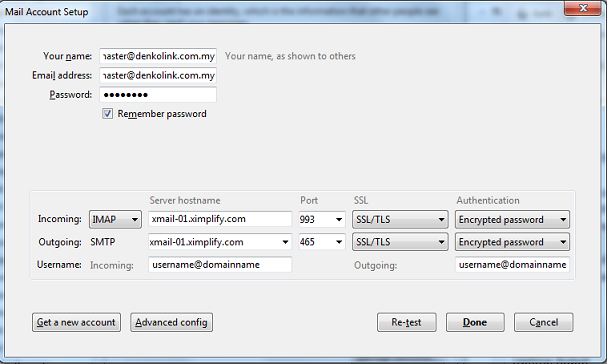
The main configuration is as below:
Email server Host Name both for Incoming and Outgoing : xmail-01.ximplify.com (please ask Rapidcloud support as this defer based on your package)
POP3 Incoming Port : 995
POP3 Outgoing Port : 465
OR
IMAP Incoming Port : 993
IMAP Outgoing Port : 465
Incoming server supports SSL? (yes or no): YES
Outgoing server supports SSL? (yes or no): YES
Further info please check on your mail client programs as below:
Configuring your mailboxes in Microsoft Outlook 2010 (MSOLK 2K10)/ 2013 (version 15)
========================================================
STEP 1: Click on the “file” TAB
STEP 2: Click “Info”
STEP 3: Click on the big square button that says “Account Settings”
STEP 4: Click "Add or Remove accounts or change”
STEP 5: Click “New” under the EMAIL TAB
STEP 6: Select 'E-mail Account'
STEP 7: Click “Next”
STEP 8: Select 'Manually configure server settings or additional server types'
STEP 9: Click "Next"
STEP 10: Select 'Internet Email'
STEP 11: Fill in Your Name – type in the name that your recipients will see
STEP 12: Fill in the Email Address – type in your complete email address
STEP 13: Select Account Type as “POP3”
STEP 14: To fill in Incoming mail server (POP3) – please ask Rapidcloud support as this defer based on your package
STEP 15: To fill in Outgoing mail server (SMTP) – please ask Rapidcloud support as this defer based on your package
STEP 16: Fill in User Name - type in your complete email address
STEP 17: Fill in Email Password – type in the password for this email account
STEP 18: Put a CHECKED/TICKED next to "Remember Password" to save your password
STEP 19: For Log on using Secure Password Authentication (SPA) – do not check this box
STEP 20: Once you have filled in the above information, click "More Settings" button
STEP 21: Click "Outgoing Server" TAB (on top)
STEP 22: Checked (TICK) "My outgoing server (SMTP) requires authentication"
STEP 23: Select the radio button "Use same setting as my incoming mail server"
STEP 24: Click "Next" then the test screen will appear showing both incoming and outgoing server tested successfully
STEP 25: Finally, click Close and then click Finish to complete your email setup
Configuring your mailboxes in Microsoft Outlook 2007 (MSOLK 2K7)
=======================================================
STEP 1: From the top menu bar, click on Tools and select Account Settings
STEP 2: Click the "New" button
STEP 3: Checked (TICK) the box next to Manually configure server settings or additional server types and click "Next" button
STEP 4: Fill in Your Name – type in the name that your recipients will see
STEP 5: Fill in the Email Address – type in your complete email address
STEP 6: To fill in Incoming mail server (POP3) – please ask Rapidcloud support as this defer based on your package
STEP 7: To fill in Outgoing mail server (SMTP) – please ask Rapidcloud support as this defer based on your package
STEP 8: Fill in User Name - type in your complete email address
STEP 9: Fill in Email Password – type in the password for this email account
STEP 10: Put a CHECKED/TICKED next to "Remember Password" to save your password
STEP 11: For Log on using Secure Password Authentication (SPA) – do not check this box
STEP 12: Once you have filled in the above information, click "More Settings" button
STEP 13: Click "Outgoing Server" TAB (on top)
STEP 14: Checked (TICK) "My outgoing server (SMTP) requires authentication"
STEP 15: Select the radio button "Use same setting as my incoming mail server"
STEP 16: Click "OK" to confirm the settings.
STEP 17: Finally, click Next and then click Finish to complete your email setup.
Configuring your mailboxes in Microsoft Outlook 2000/2003 (MSOLK 2K/ MSOLK 2K3)
=============================================
STEP 1: Click on the Tools menu in MSOLK
STEP 2: Click on Email Accounts
STEP 3: Click Add a new Email Account
STEP 4: Click Next
STEP 5: Select POP3
STEP 6: Click Next
STEP 7: Fill in Your Name – type in the name that your recipients will see
STEP 8; Fill in the Email Address – type in your complete email address
STEP 9: To fill in Incoming mail server (POP3) – please ask Rapidcloud support as this defer based on your package
STEP 10: To fill in Outgoing mail server (SMTP) – please ask Rapidcloud support as this defer based on your package
STEP 11: Fill in User Name - type in your complete email address
STEP 12: Fill in Email Password – type in the password for this email account
STEP 13: Put a CHECKED/TICKED next to "Remember Password" to save your password
STEP 14: For Log on using Secure Password Authentication (SPA) – do not check this box
STEP 15: Once you have filled in the above information, click "More Settings" button
STEP 16; Click "Outgoing Server" TAB (on top)
STEP 17: Checked (TICK) "My outgoing server (SMTP) requires authentication"
STEP 18: Select the radio button "Use same setting as my incoming mail server"
STEP 19: Click “OK" to confirm the settings.
STEP 20: Finally, click Next and then click Finish to complete your email setup.
Configuring your mailboxes in Mozilla Thunderbird
======================================
STEP 1: Click on the “tools” TAB
STEP 2: Click “Account Setting”
STEP 3: Click on the big square button that says “Account Actions”
STEP 4: Click "Add Mail Account”
STEP 5: Fill up the mail account setup
STEP 6: Click "Continue"
STEP 7: Click “Manual Setup”
STEP 8: Select Account Type as “POP3/IMAP”
STEP 9: To fill in Incoming mail server (POP3/IMAP) – please ask Rapidcloud support as this defer based on your package
STEP 10: To fill in Outgoing mail server (SMTP) – please ask Rapidcloud support as this defer based on your package
STEP 11: Fill in User Name - type in your complete email address
STEP 12: Once you have filled in the above information, click "Done" button
STEP 13: Go back to the "Account Setting" as step 1-3
STEP 14: Go to Outgoing Server (SMTP) and choose account -> Click Edit
STEP 15: Fill up the 'SMTP server'
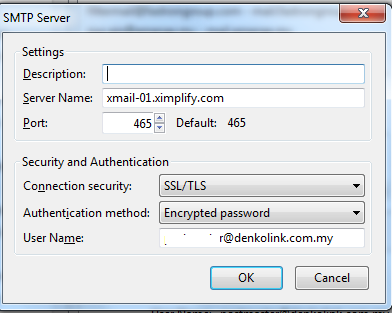
STEP 16: Click "OK" then the test screen will appear showing both incoming and outgoing server tested successfully STEP 17: Finally, click Close and then click Finish to complete your email setup
Configuring your mailboxes for Microsoft Entourage for MAC
=================================================
STEP 1: Open Entourage.
STEP 2: In the First name field, type your first name.
STEP 3: In the Last name field, type your last name.
STEP 4: Click the right arrow button.
STEP 5: Click the setting "I want to start using Entourage without importing anything" radio button in the "What do you want to import?" area.
STEP 6: Click the right arrow button.
STEP 7: Check the box next to Enable Junk Mail Filter.
STEP 8: Click the right arrow button.
STEP 9: In the Your name field, type your name.
STEP 10: Click the right arrow button.
STEP 11: Select "I already have an email address I'd like to use"
STEP 12: In the E-mail Address field, type your full email address (e.g., sample@yourdomain.com).
STEP 13: Click the right arrow button.
STEP 14: Click the arrow box on the My incoming mail server is a(n) pop-up list and choose POP.
STEP 15: In the Incoming mail server field, for your Incoming mail server (POP) please ask Rapidcloud support as this defer based on your package
STEP 16: In the Outgoing (SMTP) mail server field, please ask Rapidcloud support as this defer based on your package
STEP 17: Click the right arrow button.
STEP 18: In the Account ID field, type your full email address (e.g., sample@mydomain.com)
STEP 19: In the Password field, type your email password
STEP 20: Check the box next to Save password in my Mac OS keychain if you wish to have your password saved.
STEP 21: Click the right arrow button.
STEP 22: In the Account name field, type your full email address (e.g., sample@mydomain.com).
STEP 23: Check the box next to Include this account in my Send & Receive All schedule.
STEP 24: Click the Finish button.
Configuring your mailboxes for Apple IOS 3/4/5 based IPAD and IPHONE
====================================
STEP 1: Tap on "Settings" from your main screen;
STEP 2: Tap "Mail, Contacts, Calendar" button;
STEP 3: Tap "Add Accounts";
STEP 4: Tap "Other" button;;
STEP 5: Enter "Name";
STEP 6: Enter "Email Address";
STEP 7: Enter "Password";
STEP 8: Enter "Descriptions" (Just a description to define your email account, e.g. Michael's POP Email Account)
STEP 9: Press "SAVE" in the upper right hand corner;
STEP 10: Choose the type of account as "POP";
STEP 11: To key in the incoming mail server: please ask Rapidcloud support as this defer based on your package
STEP 12: Enter Username: YOUR EMAIL ADDRESS;
STEP 13: Enter Password: YOUR EMAIL PASSWORD;
STEP 14: To key in the Outgoing mail server: please ask Rapidcloud support as this defer based on your package
STEP 15: Enter Username: YOUR EMAIL ADDRESS;
STEP 16: Enter Password: YOUR EMAIL PASSWORD;
STEP 17: Click "SAVE" on your right hand corner;
STEP 18: Tap on "Settings" from your main screen;
STEP 19: Tap "Mail, Contacts, Calendar" button;
STEP 20: Tap on YOUR EMAIL ACCOUNT;
STEP 21: Scroll down to the Outgoing Mail Server;
STEP 22: Change "Authentication" to "Password";
STEP 23: Make sure the SSL is ON;
STEP 24: Click "SAVE" on your right hand corner;
Configuring your mailboxes for Apple Mac Mail Application
=================================================
STEP 1: Open Mail (click it on the Dock or open it from the Applications folder).
STEP 2: If the "Welcome to Mail" assistant does not appear, choose Add Account from the File menu.
STEP 3: Fill in the Full Name, Email address, and Password fields.
Note: Your email account password will be stored in Keychain to allow you to automatically log in to your email account when you open Mail.
STEP 4: Deselect "Automatically set up account" if it is enabled. Click Continue to proceed.
STEP 5: Choose the proper Account Type.
STEP 6: Give your account a useful description, such as "Anne's Gmail account" or "Juan's Yahoo! email account". It can be called whatever you want.
STEP 7: To enter your Incoming Mail Server please ask Rapidcloud support as this defer based on your package, User Name and Password. Click Continue to proceed.
STEP 8: If prompted, enter your Incoming Mail Security settings. Click Continue to proceed.
STEP 9: For Outgoing Mail Server, a useful description such as "My Outgoing Mail Server" or "Domains Outgoing Mail Server".
STEP 10: To enter the Outgoing Mail Server details please ask Rapidcloud support as this defer based on your package
STEP 11: If necessary, select "Use Authentication" and enter your User Name and Password. Click Continue to proceed.
STEP 12: If prompted, enter your Outgoing Mail Security settings. Click Continue to proceed.
STEP 13: Verify your settings in the Account Summary. Check "Take account online". Click "Create" to complete the process.
Configuring your mailboxes In an Android based Phone Application (SAMSUNG GALAXY NOTE/S2/S3)
========================================================
STEP 1) TAP on the “Application” icon from your main HOME screen;
STEP 2) TAP on “Email” icon;
STEP 3) On TOP left of the email application, TAB on your current account name;
STEP 4) the list of accounts configured will appeared;
STEP 5) Press the “Menu button” on the left side of the screen;
STEP 6) TAP on “Add Account”;
STEP 7) Fill in the email address;
STEP 8) Fill in the password;
STEP 9) Scroll down screen and TAB on “Manual Setup” button;
STEP 10) Choose POP3 Account;
STEP 11) Fill in “User name” with email address;
STEP 12) Re-Enter password again;
STEP 13) Next to “POP3 Server”, for the Incoming Mail Server please ask Rapidcloud support as this defer based on your package
STEP 14) for “Security Type”, choose “none”;
STEP 15) set “Port” as 995 for incoming server;
STEP 16) set “Delete email from server” according to your choice from the drop down menu;
STEP 17) Press NEXT button to proceed, wait for the “Outgoing server settings” to appear;
STEP 18) To change SMTP server setting to please ask Rapidcloud support as this defer based on your package
STEP 18) for “Security type”, choose “none”;
STEP 19) Set port to 465
STEP 20) Tick on “Require Sign-in”;
STEP 21) Type in “user name” with full email address;
STEP 22) Re-Keyin password again;
STEP 23) Press NEXT button to proceed, wait for the “Account options” to appear;
STEP 24) Under “Email check frequency”, choose from the choice of drop down menu. Recommended setting is 5 minutes;
STEP 25) Place a TICKED on the box “Notify me when email arrives”;
STEP 26 Press NEXT button to proceed, wait for the “Account options” to appear;
STEP 27) Give the Account settings a name of your choice under the “Give this account a name (Optional)” settings;
STEP 28) Under “Your Name”, type in the name that you wish for the recipient to see when the email is sent from this smart mobile;
STEP 29) Press “Done” to finalize the account settings;
STEP 30) you are now ready to send and receive email from now on using this phone.
PART 2 of 2) HOW TO CONFIGURE SMTP AUTHENTICATION
Below steps by steps guide indicates how to configure SMTP Authentication for email sending in respective computer software or mobile phones. This is required to prevent the bounced back “error 550, We do not relay” error during email sending.
SMTP Authentication for Microsoft Outlook 2010 (MSOLK 2K10)
=================================
1) Click on the “file” TAB
2) Click “Info”
3) Click on the big square button that says “Account Settings”
4) Click "Add or Remove accounts or change”
5) Select the email account from the list and click “Change”
6) The Internet E-mail Settings appear
7) Click "More Settings" Button
8) Click "Outgoing Server" TAB
9) Put a TICK next to the My outgoing server (SMTP) requires authentication
10) Choose "Use same setting as my incoming mail server"
11) Click OK
12) Click Next
13) Click Finish and you are done
SMTP Authentication for Microsoft Outlook 2007 (MSOLK 2K7)
================================
1) Click on the Tools menu in MSOLK 2K7
2) Click on "Account Settings"
3) Click "Email" TAB
4) Click once on the email account to select the email account
5) Click "Change" button
6) The Internet E-mail Settings appear
7) Click "More Settings" Button
8) Click "Outgoing Server" TAB
9) Put a TICK next to the My outgoing server (SMTP) requires authentication
10) Choose "Use same setting as my incoming mail server"
11) Click OK
12) Click Next
13) Click Finish and you are done
SMTP Authentication for Microsoft Outlook 2000/2003 (MSOLK 2K/ MSOLK 2K3)
=============================================
1) Click on the Tools menu in MSOLK
2) Click on Email Accounts
3) Click View or change existing e-mail accounts
4) Click Next
5) Highlight an email account
6) Click Change
7) Click More Settings
8) Click Outgoing Server tab
9) Check the My outgoing server (SMTP) requires authentication
10) Make sure that Use same setting as my incoming mail server is selected
11) Click OK
12) Click Next
13) Click Finish and you are done
SMTP Authentication for Microsoft Entourage for MAC
============================================
1) Open Entourage.
2) Click on Tools and select Accounts
3) Select the Mail tab
4) Check your incoming and outgoing mail server.
5) Select "Option" tab (on top)
6) Choose "advanced sending options"
7) [TICK] SMTP Servers requires authentication
8) Use same setting as my incoming mail server
9) Click OK
10) Click Ok (Close your account settings
SMTP Authentication for Apple IOS 3/4/5 based IPAD and IPHONE
======================================================
1) Press HOME button
2) TAP on “Settings” icon
3) Select the Mail tab
4) TAP on “Mail, Contacts, Calendars”
5) TAP into the account to configure
6) Scroll downwards to the bottom of the Account setting
7) Under “Outgoing Server”, TAP on SMTP
8) TAP on the mail server under “Primary Server”
9) Server must be “ON”
10) Fill in “Host Name” with your Domain’s Outgoing Server
11) Fill in “User name” with your FULL EMAIL ADDRESS
12) Fill in “Password” with your EMAIL PASSWORD
13) Use SSL must be “ON”
14) “Authentication” type is Password
15) “Server Port” is 465
16) TAP on “Done” blue button on top corner right to confirm settings
17) TAP button on top corner left to go back to the account setting
18) TAP “Done” blue button on top corner right again to finalize account setting
19) Press HOME button to go to main screen
20) TAP on “Mail” icon and compose a test email to your own email address to test
SMTP Authentication for Apple Mac Mail Application
===========================================
1) From the Mail menu choose Preferences
2) On the lower right corner of the window, click on Server Settings... (Under Outgoing Mail Server (SMTP)). If this option is not visible, make sure you have the correct mail account selected, and that the Accounts and Account Information tabs are selected.
3) Pull down the Authentication menu and select Password.
4) Enter your username and password.
5) Click OK.
SMTP Authentication for Email Enabled Printer/ Fax Machines
==================================================
1) Login to the printer configuration screen and find the SMTP outgoing server setting page. Set the SMTP Authentication to “ON” (or ENABLE/ACTIVE) and key in the necessary email and password. Save the changes.
2) Set the POP before SMTP to ON (or ENABLE/ACTIVE). Save the changes.